Best selling wood projects
What is it about the dovetail joint that it seems to have such mystique these days? In the past, it was just a standard every day method of jointing timber. Maybe it is the prevalence of new technologies and techniques better suited to mass production, man-made panel products and flatpacking which has lead to the growing fascination for this traditional joint. Most woodworkers creating dovetail joints nowdays use screaming routers aided by finely machined metal router jigs to cut these joints. Sure, they are sharp and crisp joints, but the journey is just not the same... there is something wonderful about using your hands and traditional hand tools to make a nice dovetail joint.
If you are interested in how to cut these joints by hand, I invite you to follow through the process and come with me on the journey.
Half-blind dovetails on the top edge of some sheoak bedside cabinets under construction.
I am one of those people who does not own a dovetailing router jig. I cut my dovetails by hand, just as it has been done for centuries - though on occaisions I may use use a bandsaw or a drill press instead of a coping saw to help with faster waste removal. The hand cutting of dovetails can be almost as fast as setting up and mucking around with router jigs. The key of course is good marking out, quick and accurate hand sawing, and good chisel work. Sounds like a whole lot of satisfaction coming up! The joy of woodworking...
Getting started. Firstly, we need some pieces of timber to join together. The pics through this story were taken during the making of a sheoak bedroom setting for a customer. This involved cutting "through dovetails" in the making of 6 drawers for the bedside cabinets, and 4 big drawers under the kingsized bed, and the cutting of "half blind dovetails" for the jointing of the bedside cabinet carcasses and the bed frame. All of the timber started out as 6"x1" material. The cabinet sides and tops were glued up using "lightning joints" to create the big panels which were 21mm thick, as were the big drawer components which were 19mm thick. The bedside cabinet drawer components were 14mm thick, and were butt jointed to bring the compenents to width.
The bedside cabinet side panels completed ready for the dovetail joints.
The marking out - tails first.
We are about to make the drawer boxes. These will be "through dovetails".
There are many different ways of doing this, but for this job I have created a "story stick" which is being used across all of the dovetails in this partticular furniture set. A piece of scrap timber has the pin and tail spacings marked out on it. There are two sets of these markings, one at each end of the stick. One set has all the pins and tails 1mm wider than the other set. This way the best fit can be found for each drawer side, but they will look consistent. It makes marking out quicker too. With the drawer sides selected and arranged in their pairs, first the bases lines for the pins and tails are scribed all round each piece. Several pairs are then cramped together with the scribed ends lined up flush, to mark the tails on the ends.
A marking gauge is used to mark the base lines for the pins and tails. These lines will be 1mm wider than the drawer side thickness.
Some woodworkers argue whether it is better to cut the pins first or the tails first. It really doesnt matter. Whatever works for you, I reckon. Me? I am a tails first person. Why? Because that is the way my father taught me to do it many years ago. It still works nicely for me every time!!
Marking the tails on the ends or two pairs of drawer sides, using the story stick.
A marking knife and square are used to transfer the tail markings across the ends of the drawer sides.
The sliding bevel is used to transfer the scribed lines on the ends back to mark the tails. A 1:7 angle is used here. A pencil is used, marking well beyond the scribe line for the base of the tails.
The lines on the very ends of the drawer sides are scribed, to aid very accurate sawing square to the face. A pencil is used to mark the waste. The sides of the tails are marked with a pencil, as the accuracy of the cut is not as important on this plane. The pencil lines go well beyond the scribed base line to assist with the sawing which is done by eye following those pencil lines, stopping at the scribed base line.
The marking out of the tails on the drawer sides is complete. Time to start cutting.
Cutting the tails.
It is easiest to cramp the drawer sides in a vertical position such that the group of lines being cut are vertical. This is easiest for the eye, making for accurate cutting. Then the piece is tipped and re-cramped so that the other group of lines are vertical. The saw kerfs are cut accurately on the waste side of the scribed line and following the pencil lines, own the the scribed base line of the tails.
Cramped so that one group of lines being sawns is vertical. When these are all cut the drawer side is turned so that the remaining lines are vertical - it is much easier to make the cuts this way.
My wonderul Lie-Nielson 15point rip sharpened dovetail saw is an absolute pleaseure to use for this task. Quick and very accurate. Cutting down to the scribed base lines.
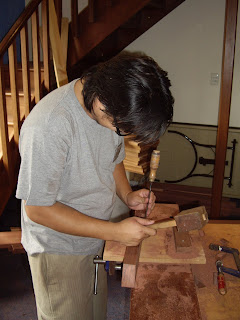
Chopping the waste from between the tails. All those parallel cuts in the waste were done on the bandsaw to speed up waste removal. Traditionally you would use a coping saw. Careful chisel work from both sides to the scribed base line is what we are seeking here.
Thats what we are looking for! One of the drawer sides with the tails cut. Then it is on with the next one...
A whole bunch of drawer sides with their tails cut. Time to mark out and cut the pins.
Marking and cutting the pins.
With the drawer end held vertically low in a vice such that the drawer side can be laid on the top at 90 degrees, this enables the accurate marking out of the pins.
The base line of the tails is lined up perfectly with the inside face of the drawer end below it. A marking knife is then used to carefully scribe the positions of the tails. A pencil is then used to mark the sides of the pins at 90 degrees to the edge.
With the tails marked out, the cutting to the base line is done - making sure to be right on the waste side of the scribed line, for nice firm fitting joints! Cut on the wrong side of the line and you get a useless sloppy fit.
Once again the waste is removed with careful chisel work from both sides down to the base line, resulting in a nice set of pins. As this is a drawer front side, the same will be done to the opposite end also.
A whole bunch of drawer front sides with their pins cut ready to go.
Bringing it all together.
Having done all that marking, sawing and chopping, the moment of truth finally arrives when we put the respective pieces all together. ?
The moment of truth! The two parts of the joint, the pins and the tails, come together... like a dream.
These two parts should be able to be hammered together as a firm fitting joint. Too tight and something will split, so some trimming may be required to avoid this. However in this case no trimming was needed. If fact, no triming was required for the whole 12 joints required for these 6 small drawers. Each was a perfect and firm fit. I reckon there is nothing quite as satisfying as these joints coming together so beautifully first go!
Nice! Another good fit. Note that the extra 1 mm of overhang we had allowed for is there on both sides, to be cleaned up after the drawer has been finally assembled and the glue has dried in the joint.
It is a beautiful thing... no gaps and no filler. Just a good honest joint.
If you were wondering about the fitting of the rear end of the drawers, in this case the rear joints used are a housing joint. The dovetails are only used on the front two joints of the drawer box. The groove for the drawer bottom is cut within the bottom tail of the joint, so that it is not evident from the outside. Cutting in the pin area would be a mistake!
A drawer box glued up and ready to be cleaned up and polished. These drawers will have an additional drawer front attached to the front of the drawer box. If the visible drawer front was also the front of the drawer box, then a different type of dovetail joint would be used - a "half blind" dovetail joint.
What about those half-blind dovetails?
The bedside cabinets each house 3 drawers. These cabinets sides are to be jointed to the top by way of half-blind dovetail joints, as there was to be no overhanging top. It will create a nice edge joint feature.
The marking out of this joint is different, as the tails do not go all the way through the adjoining piece.
These joints are 480mm long. Thats a lot of tails to cut!
Thats a lot of pins to cut as well...
A forstner bit was used in the drill press to speed up the removal of the waste when the pins were being cut. The cutting of the pins for a half-blind dovetail requires very accurate chisel work. Too many opportunities for nasty gaps!
The base shelf of the cabinet is housed in a stopped trench. These joints must be fitted prior to assembly of the cabinet. The half blind dovetails have already been cut and test fitted in a "dry run".
Here it is, the cabinet joints all glued up and ready to get cleaned up.
Cleaned up and polished. One of the joints at the top of the bedside cabinets. A good example of a half-blind dovetail joint.
So there you have it. The wonderful journey of joining two pieces of timber in a tried and proven traditional method which has both mechanical strength and aesthetic beauty. And no noisy routers.
Dovetails are such a delight to create using my trusty hand tools, and so satisfying to the soul...
Best selling wood projects