
Pages

Tampilkan postingan dengan label mouldings. Tampilkan semua postingan

Selasa, 22 Maret 2016

Best selling wood projects - An Elegant Jelly Cabinet Construction Part 2 Making Mouldings

Best selling wood projects

Best selling wood projects


Artisans Expo on Friday, Camden Haven Show yesterday, Sunday chores and family time .......
So where am I up to?
Components need to be cut and sized - and if not square, made so.

Several parts - the sides, top, bottom and back panel are all wider than the stock that I have available, so some edge jointing and gluing are called for.  Ill use biscuits again, as they are convenient, strong and quick.

While the glued up panels are drying, Ill get the remainder cut out, and make a start on the mouldings for the crown and the base.  I am going to make my own mouldings from the offcuts of the New Guinea Rosewood.  Should be fun.

Here is the moulding plane that I have chosen for cutting this particular moulding.

It was made of beech by J Creagh in Cincinati, Ohio - probably in the late 1800s or perhaps the early 1900s.

It is boxed and sprung.
It has an inlaid boxwood wear strip down the left - as seen here - hence boxed.

As a sprung plane, it has two spring lines scribed on the front. These indicate that the plane has to be tilted to its left as it is used, to give the correct orientation to the cutter as it is presented to the timber.

The squared section on the right side of the sole as seen in this picture, is the fence that abuts the edge of the timber.  Keep all these things in mind when using moulding planes like this.


Look closely at this front shot of the plane and you will see the faint spring lines - parallel to the red arrows that I have drawn to show the orientation of the springing.
The fence abutting the edge of the timber can also be clearly seen on the right.  I have just started this, and already a groove is beginning to appear.

The plane will stop cutting when the built in depth stop reaches the level of the surface.  As can be seen here, there is a long way to go yet.
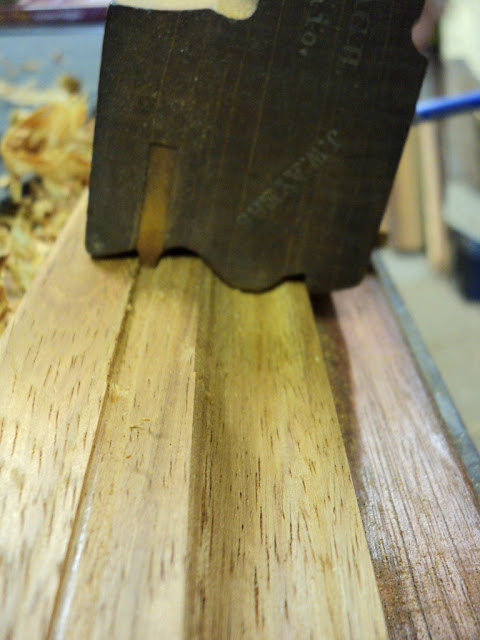


 As I cut deeper, the boxwood strip starts to contact the surface and the second groove begins to take shape.

It usually starts at the far end of the workpiece, and slowly extends along the full length.

Special care must be taken to even out the cutting depth as soon as the groove is the full length.  If left too long, there will be too much to remove at the start end of the board, and it will be awkward to adjust afterwards.

Best results in cutting mouldings like this are in straight grained timber.  There are a couple of curly bits in the timber I am using, and these will require remediation later.


Mouldings like this can be cut with a router, but will require a router table and multiple passes of the machine.

This creates mountains of dust and chips, and if not done carefully, runs the risk of burning the timber from the speed of the router bit.

With a moulding plane, there are mounds of shavings, but no dust.

They save on power and give a workout at the same time - win, win!


The finished mouldings fit the profile of the plane perfectly.  Ill trim them to width later when I decide what looks best on the finished cupboard.

I have been trying to discover the correct term for this profile.

Two possibilities are a quirked cyma reversa  and a grecian ogee with fillet.
Perhaps even a quirked grecian ogee.

If you know, please leave a comment.


Did someone mention shavings!


OK, the pieces are coming together.

Wont be long before there will be some serious joinery.

I have noticed that my reference lines are becoming faint, so I will re-mark those before going any further.

I am going to start with the sides, top and bottom, and then build the back panel to suit the size of the carcass.

The front will have a face frame to house the door, which will be of frame and panel construction.

Ill make the door last so that it will be a snug fit.
Not sure how far Ill get this week, as there are a few other items needing attention around the place.
Well see ...........


Happy woodworking to all ...........
Best selling wood projects
Read More..

Jumat, 05 Februari 2016

Best selling wood projects - An Elegant Jelly Cabinet Construction Part 4 Making the Door Frame

Best selling wood projects

Best selling wood projects


I had the pleasure, over the last week, of travelling north to join my siblings in a wonderful family event that grew to include many cousins, aunts, nephews, nieces and extended clan members.  Since nothing is more important than family,  woodwork has taken a back seat for a while.

Getting back to the Jelly Cupboard has taken a bit of effort, as I have lost the rhythm that was developing as the parts began to take shape.

I am going to dovetail the joints in the carcass, and since this is a major step, and I had only a little time today, I decided to tackle a smaller part to help get the woodwork juices flowing again.
And so .... to the door.

I havent got the precise dimensions yet, so this work will concentrate on the stiles and rails.  As a frame and panel construct, the frame needs to be brought to final thickness all round, and the groove cut for the panel.

Using a Wooden Plough Plane


Once again, I will use hand tools for this, and have chosen to use a plough plane - or plow plane as some spell it.

The groove will be 5/16 inch wide, and as this is too wide for my little Record 043, I will turn to a wooden plough/plow plane made by Malloch of Perth.

 The blades must be sharp, so this is the first task.  Coarse/fine oilstone followed by hard white arkansas, gives a keen edge.


These old blades by Mathieson are all laminated - the hard crucible steel is forge welded to the softer backing iron.

All parts of this plough plane, bar the depth stop, are held in place by wedges - this includes the blade and the fence arms.  Because the wedges can be fragile, a small wooden mallet is used to adjust them.


Setting the blade on these old wooden ploughs, requires careful alignment of the leading edge of the back skate, with the groove that is cut into the back of the blade itself.

The rear skate has a leading edge that is bevelled from both sides to accommodate the groove.

If the blade is sharp, and the timber being grooved of straight grain, then the cutting depth can be aggressive. This will save time and cut down on labour.


Adjusting the wooden fence so that the groove runs true, and is exactly where it is wanted on the frame - is worth the time taken to do it properly.

Because each of the fence arms can move independently, the fence has to be checked at each end.

Of course the true distance will be from the fence to the outside cutting corner of the blade.  Measure this first, then adjust the distance of the fence ends from the skates accordingly.


Before finishing, the depth of cut has to be decided and set.  The built-in depth stop is wound down to the required distance from the cutting edge of the blade, and then locked in place with the locking screw on the side of the plane.


 Once again, I start at the far end of the workpiece, and gradually plough my way over longer and longer strokes of the plane, until there is a continuous groove.

Start grooving more aggressively from the near end, to make the groove uniform all the way through - before finishing at the final depth.


The plane will stop cutting when the depth stop bottoms out on the workpiece.


If the completed groove shows any roughness or tearout in the sidewalls of the groove, then these can be cleaned up with a side rebate plane.  Mine gets plenty of use.


Here is one of the rails and both of the stiles after finishing.  Once again there is plenty of hamster litter as a by product of the ploughing process.

Ill leave this now until the carcass is assembled, before making up the panel and assembling the door.
Dovetails are next.
Bring it on!

....and happy woodworking to all.
Best selling wood projects
Read More..